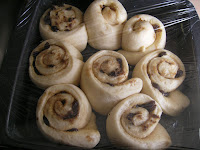
We made the dough as per the recipe, proved it then rolled it out. We then spread our dough with the lovely butter and sugar mix, added a sprinkling of mixed spice, then lovingly sprinkled it with raisins.
We rolled the dough up like a Swiss roll, then chopped it into eight pieces. These were then put into a greased baking tin, covered with clingfilm, left to rise.

They were then baked in the oven and came out looking yummy!
The girls insisted on drizzling a rather large amount of pink icing over the top.
They are delicious! My husband says they taste better than his favourites from our local bakery back in NZ. High praise indeed. Here is the recipe if you would like to make some of your own, I highly recommend it.
Chelsea Buns from Wendy at Quirky Cookies
225g (8oz) strong white bread flour
25g (1oz) caster sugar
1/4 tsp salt
25g (1oz) softened butter – this is for the dough
1 1/2 tsp fast action dried yeast
1 medium egg, beaten
90ml (3 fl oz) warm semi-skimmed milk
25g (1 oz) butter really softened, but not melted – this is for the filling
65g (2 1/2oz) light muscovado sugar
115g (4oz) dried fruit
1) Combine the flour, sugar, salt and yeast into a mixing bowl (I used my KitchenAid as usual). Make a well in the centre and add the softened butter, egg and milk. Mix to make a soft dough. Knead until smooth. It’s at this point I remember how much I love my KitchenAid, and make myself a coffee.
2) Cover and prove until doubled in size. I find that if I’m in a hurry the airing cupboard can do this in around half an hour, and I’ve had no adverse side effects from quick proving so far. Generously butter and line a 7″ square tin. Make sure it’s not a loose bottomed one, or you’ll get problems later on and loose your filling.
3) Flour your work surface, and roll out the dough, (no need to knock it back) to a rectangle measuring about 12 x 9 inches. If you get the edges as square as you can it will help to make your buns look even, but I quite like the squiffy homemade look. Well, that’s my excuse and I’m damn well sticking to it!
4) Spread the softened butter as evenly as you can over the dough. Sprinkle the sugar and the dried fruit on top, and gently press it into the butter. Now, roll up the dough along the long edge, as though you were making a Swiss Roll (and don’t tell me you haven’t!) Seal the edge. I find that smoothing it down with the flat side of a paring knife can help here, but don’t get too ocd over this bit. Turn the roll over so that the seal is underneath and divide the roll into 9 equal buns.
5) Place the buns, cut side down, into the buttered and lined tin, and leave to prove until the dough has doubled in size, and they have all joined together into one big Chelsea bun muddle. I baked mine in a 180 degree oven, for about 15 minutes, but I’ve got a particularly hot and fast cooking oven. You know your oven better than I do, and I suspect most of you will need to set the oven slightly higher, and /or cook for a little longer. Some recipes suggest covering the buns with parchment or foil, but the fan is so strong in my oven this has never worked for me. Once cooked, cool on a wire rack, and eat them as soon as you dare.


yum, that does look nice.
ReplyDeleteI am under strict instructions to make these tomorrow!!
ReplyDelete