Powered by Blogger.
Showing posts with label Christmas. Show all posts

Food Bank Reverse Advent

Wednesday, 16 November 2016
We regularly give supplies to our local Foodbank, usually by adding a few items to our shopping then putting them in the trolley at the collection point in the supermarket.  This festive season I wanted to do something different.  I decided to take part in the Foodbank Reverse Advent, and donating a box of supplies at the end of November.  By donating at the end of November, or early December, it enables the Food Bank to distribute the supplies to those in need before Christmas.

A group of school Mums and I have been putting aside one item each day in November and will be taking our boxes to the local Food Bank at the end of November.  Our local Cambridge City Foodbank also has a Christmas Hamper Appeal which my family and I are also donating groceries to.

The Cambridge City Foodbank want to distribute 200 hampers to needy Cambridge families before Christmas.  So they are seeking 200 people who will fill one hamper each with specific items. If you would like to sign up please email info@ccfb.org.uk


The items needed for the Reverse Advent Christmas Hampers are, one each of the following, in a large carrier bag:

Chocolate Christmas Log or Christmas Cake
Children's Christmas Chocolate (Selection Box)
Fancy Sweet Biscuits
Pringles or similar
Cheesy Biscuits or similar
Nuts
Tinned Ham
Pickles (Sweet)
Tinned Tuna or Salmon
Chicken Paste
Dried Fruit (Apricots, Pineapple, etc)
Salad Cream or Mayo
Jam
Shower Gel or Shampoo
Christmas Crackers

Gather all the items and then drop of them off in the carrier bag on Saturday 10th December from 10am to 2pm OR Tuesday 13th December between 9am and 4pm at:

CCFB Warehouse
Unit 4
Orwell Furlong
Cambridge
CB4 0WY

Please do give to your local Food Bank if you can, even a few items will make a difference.  There are some local festive campaigns running, do contact organisations in your are to see if you can help out and which items they are in need of.


Merry Christmas!

Thursday, 25 December 2014

My family and I would like to wish all my blog readers and your families a very Merry Christmas and say a HUGE thank you for reading and supporting me and my blog. I hope you all have a wonderful Christmas Day and a great start to the New Year.

Special thoughts, big hugs and hopes for peace to all those for whom Christmas is painful, stressful or sad for whatever reason.  Special thoughts and thanks also to those who keep us safe and well over this holiday time, to all those working - whether paid or unpaid - we hope you have a restful time when you can and thank you for all you do.


From my family to yours, Merry Christmas Everyone!

Chocolate, Cherry and Cranberry Wreath Cake

Saturday, 20 December 2014
I decided to bake one of these cakes for my 8yo's teacher who is most lovely, and like most teachers, in need of a chocolate treat near the end of this term at school.  

Chocolate, Cherry and Cranberry Wreath Cake


200g butter, softened
200g caster sugar
2 tsp vanilla bean paste or good quality extract
4 free range eggs, I used large
225g self raising flour
50g cocoa powder
100g glace cherries, rinsed and halved
75g dried cranberries

Preheat your oven to 190C/170C Fan.  Grease a ring cake tin really well.  I used a 25cm ring cake pan.

Cream the butter, sugar and vanilla together until pale and fluffy.  Gradually beat in the egg whilst your mixer or hand mixer is running.  If the mixture looks like it may be starting to curdle add a tablespoon or two of flour.  This will stabilise the mixture.

Once all the egg has been incorporated stir in the flour and cocoa powder until completely incorporated.  Add the cherries and cranberries and mix once again.

Spread the mixture evenly into your prepared cake tin.  Bake for 40 - 50 minuntes depending on the size of your cake tin.  Leave in the tin for around 10 minutes before turning the cake tin upside down on a wire rack.  Remove the cake from the tin and leave to cool completely.


Chocolate Glaze

150g chocolate, roughly chopped
50g butter
1 Tblsp golden syrup
1 tsp vanilla extract

In a bowl set over a saucepan of simmering water combine the chocolate, butter and golden syrup.  Stir until the chocolate has melted and the mixture is smooth.  Add the vanilla, let the mixture cool a little then spread the warm glaze over the top of your cooled cake.


Gingerbread Houses

Tuesday, 16 December 2014
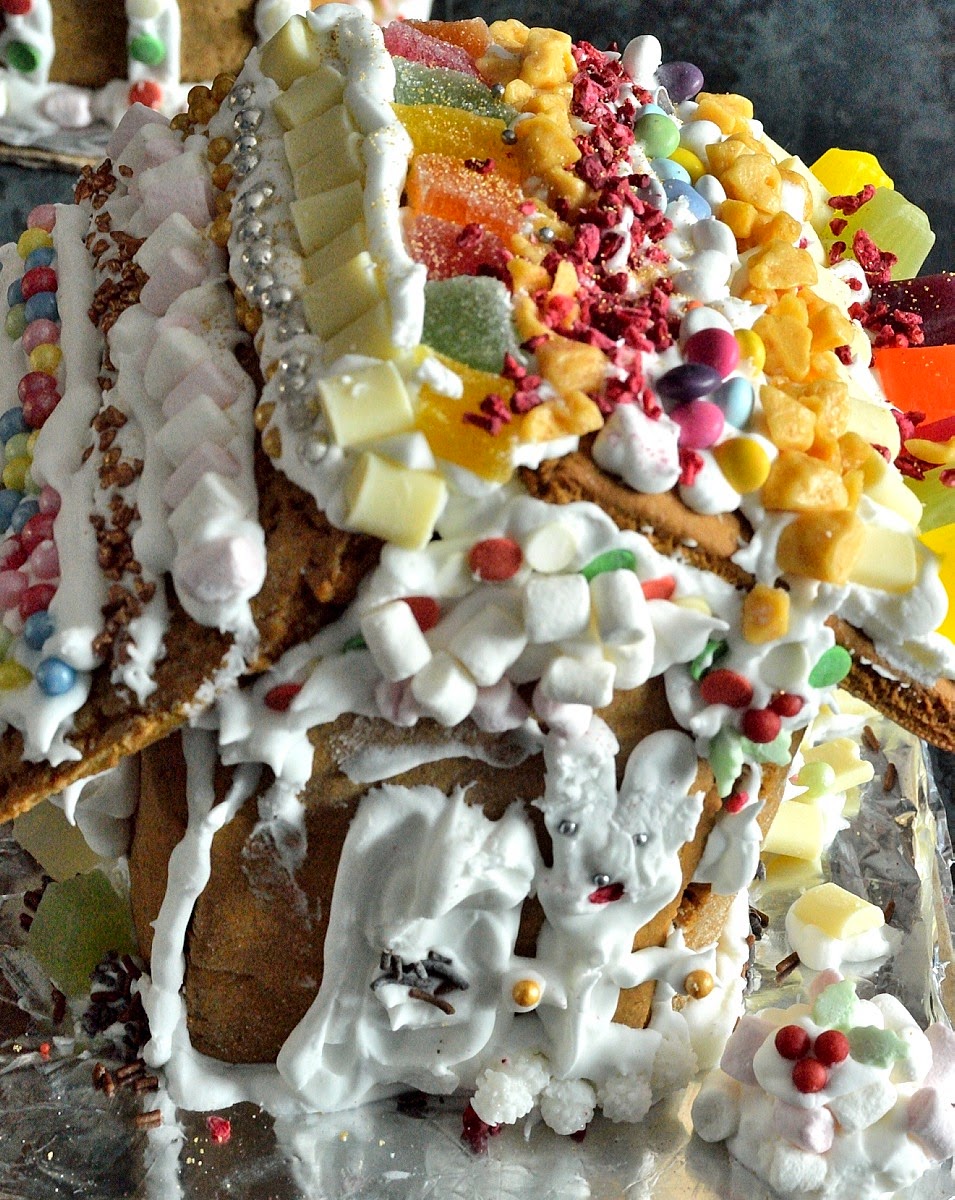
As is a festive tradition in our house, gingerbread houses were made and decorated.  This year instead of one big house that all of us work on, each of my 3 daughters made their own.  It kept them busy for a long time.  They all made their own dough, cut out the templates, baked the dough then assembled and decorated their houses.

They used the dough recipe from this post and some of our rather impressive sprinkles collection.


Do you make gingerbread houses over the festive season? Are there any traditional bakes that you make with/for your family this time of year?

Lussekatter, Lucia Saffron Buns

Saturday, 13 December 2014
We've been baking some Scandinavian Christmas breads lately as a change from our usual Christmas bakes.  It is so much fun! This time we baked Lussekatter or Lucia Saffron Buns.  These buns are traditionally eaten in Scandinavia during Advent and especially on December 13 which is Saint Lucy's Day.  Saint Lucia, is the patron saint of light and December 13th was originally thought to be the shortest day of the year so it is still the date chosen in Sweden to celebrate the return of lighter days.  


The buns are similar to brioche but flavoured with saffron.  They are shaped in spirals with two raisins in the center of each swirl.  We made these by hand on a cold and crisp Saturday morning and ate hem for afternoon tea accompanied by a hot chocolate.  All 3 girls helped mix, knead and shape the dough - a great collaborative effort!

Lussekatter, Lucia Saffron Buns


1 tsp saffron threads
250 ml semi skimmed milk
75g butter, melted and cooled
500 g strong white bread flour
50g sugar
1 tsp baking powder
1 tsp salt
10g fast action yeast
24 raisins
beaten free range egg, to glaze

Heat the milk until hot then add the saffron threads, stir well then leave to cool for 10 minutes so the saffron can infuse the milk with flavour and colour.  Strain the milk to remove the saffron threads then stir in the melted butter until completely combined. 

Put the flour, sugar, baking powder, salt and yeast into a bowl.  Add the milk and butter mixture then mix until a dough forms.  Turn the dough out.  Knead the dough on an unfloured surface for at least 5 minutes until the dough is smooth and elastic.

Put the dough back into the bowl and cover with greased clingfilm.  Leave to prove until doubled in size, this took about an hour and a half.  Grease and line two baking trays.

Knock the dough back and divide into 12 equal pieces, ours weighed about 70 grams each.  We rolled and shaped our dough on an unfloured surface.  Roll out each piece like a sausage until it is about 25cm (10 inches) long then roll each end into the middle to form an S shape, see the photos.

Put the S shapes of dough onto the baking trays, cover once again with greased cling film and leave to prove again for 45 minutes to 1 hour until doubled in size again.

Preheat your oven to 220C/200C Fan/Gas Mark 7.  Remove the cling film from the trays of buns, brush the buns with beaten egg then bake for 8 - 10 minutes until deep golden brown.  We sprinkled a little caster sugar over the buns just before baking to give them a little more texture and make the tops sparkle.  The buns should sound hollow when tapped on the bottom.


Scandinavian Julekage

Friday, 12 December 2014
My daughters love to bake and Christmas time is the perfect time to indulge that passion.  We're always on the look out for new breads to try and at the suggestion of one of the Mums on the school run we attempted Scandinavian Julekage.  She gave me a basic idea of the recipe and we based ours on that, with a few adaptations due to lack of ingredients and me only remembering some of what she said due to baby induced sleep deprivation.  It took 3 attempts to develop a loaf I was happy with and I baked that several times just to make sure the recipe worked well.

Julekage (pronounced yoo-ley-key-yeh) is a popular Scandinavian Christmas fruit bread made from a dough enriched with butter and eggs.  The dough is filled with candied fruit, such as tropical fruit and cherries. and spiced with cardamom. We used cranberries in our bread as I'd run out of glace cherries.

The bread was enthusiastically devoured once I had taken photos and I've made two loaves since, one for us to devour, and another to the school Mum who suggested we make it.  I'm delighted to say it passed the taste test and she declared it to be delicious. 

Scandinavian Julekage


450g strong white bread flour
50g sugar
3/4 tsp salt
1 1/2 tsp fast action yeast
1/2 tsp freshly ground cardamom (you'll need seeds from around 15 pods)
80g butter, melted and cooled
2 free range eggs, beaten (I used large eggs)
150ml semi skimmed milk, lukewarm
150g dried tropical fruit
100g dried cranberries or roughly chopped glace cherries

Icing:
75g icing sugar
1 Tblsp water, or more as needed

Combine the flour, sugar, salt, yeast, cardamom, milk, eggs and butter in a bowl.  mix until a soft dough forms. 

Either knead the dough on an unfloured surface or in a mixer until smooth and elastic, this took us about 10 - 12 minutes by hand.  Knead the fruit into the dough until well incorporated.  Cover the dough and leave to prove until doubled in size.

Line a 20cm (8 inch) cake tin with a double layer of non-stick baking paper, extending it 5cm (2 inches) above the top edge of the tin.  I used two disposable cake tin liners and made a collar from a double layer of non-stick baking paper.

Knead the dough again to knock it back.  Put the dough into your prepared cake tin, cover once again, then leave until the dough fills the tin and has almost reached the top of the tin.

Preheat your oven to 200C/180C Fan/Gas Mark 6.

Bake the loaf for 35 - 40 minutes.  Cover the top of the loaf with a sheet of greased non-stick baking paper after 20 minutes cooking time, this stops the top of the loaf from getting a little too golden brown (burnt).

Leave to cool in the tin for 10 minutes then turn out onto a wire rack to cool completely.  When you tap the loaf on the bottom it should sound hollow.  Make the icing and drizzle it over the top of the loaf, we sprinkled more dried fruit over the icing for a festive touch.


Festive Bread Wreath

Wednesday, 10 December 2014
I decided to bake a couple of festive breads whilst bubs was asleep.  They turned out very well and my family devoured them as soon as they got home from work and school - luckily I managed to take photos earlier in the day!

This bread would make a great centrepiece for a festive gathering, a delicious gift idea for teachers or an impressive addition to a festive hamper.

Festive Bread Wreath


225g white bread flour
1 1/2 tsp fast action yeast
25g sugar
25g softened butter
1 free range egg, beaten
90ml semi skimmed milk, lukewarm

Filling:
50g butter, softened
50g sugar
25g ground almonds
1 tsp vanilla bean paste or extract
100g glace cherries, chopped
100g mixed dried fruit

Combine the bread ingredients in a bowl or the bowl of a stand mixer.  Mix until a soft dough forms.  Knead for 10 minutes, either by hand or in a mixer, until dough is smooth and elastic.  Put dough into a greased bowl, cover with greased cling film, and leave to prove until doubled in size.

To make the filling combine the butter, sugar and ground almonds to make a paste.  

Once the dough has proved, don't bother knocking it back just roll it out to a rectangle approximately 30cm x 23cm (12 inches x 9 inches).

Spread the filling paste over the dough then sprinkle over the cherries and dried fruit.  Roll the dough up tightly from the long edge and pinch the edge well to seal.  Gently roll the dough into a sausage shape until it measures approximately 50cm (20 inches) in length.

Use a sharp knife to cut the dough sausage down the middle lengthwise.  Turn the two pieces so the filling is facing upwards then plait the pieces together.  Bend the plait into a circle and ensure the ends are weaved together to form a wreath shape.

Cover and prove until doubled in size once again.  Preheat your oven to 200C/180C Fan/Gas Mark 6.  Bake the wreath for 20 minutes.  Once baked leave the wreath to cool on the tray for a few minutes then transfer it to a wire rack to cool completely.


Chocolate Christmas Tree Biscuits and Mini Christmas Cakes - Waitrose #bakeitforward

Thursday, 4 December 2014
When I received an email from Waitrose asking to take part in their Bake It Forward campaign I accepted without hesitation.  To take part all you need to do is bake something sweet to share with others during the season of goodwill ,share your share your photos on social media using the #BakeItForward hashtag and nominate them to do the same.

Every day Waitrose will be surprising people taking part with festive treats, including hampers and bottles of champagne.  Sharing baking and the possibility of being surprised with festive treats, what's not to like?!

We baked some Chocolate Christmas Tree Biscuits which are perfect for Christmas Fairs, Christmas parties and Christmas hampers.  We also iced some bite sized pieces of Christmas Cake which are great for teacher gifts.

Chocolate Christmas Trees


100g softened butter
100g caster sugar
2 Tblsp golden syrup or honey
2 tsp vanilla bean paste or extract
220g plain flour
1 tsp bicarbonate of soda
30g cocoa powder
100g dark/milk and white chocolate for decoration

Preheat your oven to 190C/170C Fan.  Line 2 baking sheets with non-stick baking paper.  

Cream the butter and sugar together well until pale and fluffy.  Add the golden syrup/honey and vanilla bean paste then beat again.  Add the flour, bicarb and cocoa then mix until a stiff dough forms.  

Knead the dough then roll out to 5mm thick on a floured surface.  Cut out shapes using cookie cutters and carefully transfer to your prepared trays.  Bake in the oven for 10 - 15 minutes.  Check after 10 minutes then every 2 minutes after that.  The biscuits should be slightly darker and fill the kitchen with a lovely chocolate aroma when they are cooked.

Transfer the biscuits to a wire rack to cool completely.  Sandwich the biscuits together with melted chocolate.  I used coffee stirrers from a well known chain as sticks but you can purchase cake pop sticks from a supermarket if you want. Put in the fridge until the chocolate has set.

Melt the white chocolate and drizzle over the biscuits then decorate how you wish.


The recipe makes 20 biscuits, enough for 10 completed trees.  These trees are fab individually wrapped and given as gifts, included in hampers of homemade goodies, or sold at a Christmas Fair.


Bite Sized Christmas Cakes


1.5 kg mixed dried fruit
125ml rum, whisky or brandy (use apple/orange juice for non-alcoholic version)
1 Tblsp golden syrup
220g light or dark brown sugar
250g butter, melted and cooled
4 free range eggs
225g plain flour
2 tsp mixed spice

Put the fruit in a large bowl, breaking up any large clumps.  Add the rum, golden syrup, sugar and eggs.  Mix well then add the melted butter, sifted flours and  mixed spice.  Mix until thoroughly combined.  

Pour the mixture into a deep 23cm round or deep 20cm square cake tin lined with three sheets of non-stick baking paper. Make sure the baking paper extends at least 1 inch/ 5cm above the top edge of the cake tin.  

Preheat your oven to 160C/140C Fan for about 3 ½ hours or until cooked when tested.  To test if the cake is done, insert a knife or skewer into the middle, it should come out clean with no crumbs sticking to it.  

Take the cake out of the oven, brush with a little extra run, whisky or brandy then set aside to cool completely.  Wrap well and store in an airtight container in a cool dark place until you are ready to eat it.  

This cake mixture can also be baked in empty baked bean/pulses tins or tuna tins.  A baked bean tin sized cake usually takes 45 - 50 minutes, a tuna tin sized cake usually takes 55 - 60 minutes.

We decorated ours with a layer of marzipan followed by a layer of sugarpaste and decorations.  I brushed the cakes with a little golden syrup to adhere the marzipan and sugarpaste layers to the cake bites.


* I was sent a hamper of baking goodies by Waitrose and was compensated for my time creating these recipes *

Date and Walnut Log with Cheese Biscuits

Sunday, 2 November 2014
I also made a savoury edible Christmas gift recipe, for the lovelies at Sainsbury's, because not everyone is into sweet treats and I do like a good cheese biscuit to nibble on with a glass of wine.

These biscuits are very easy to make, you just need to remember to mix together equal quantities of plain flour, butter and grated cheese. What could be simpler?!

The Date and Walnut Log just involves measuring ingredients into a food processor, mixing them, forming the mixture into logs then wrapping the logs to look pretty. So easy!

I normally include the Date and Walnut Log with Cheese Biscuits in a hamper with a bottle of wine and some other savoury goodies.

Date and Walnut Log

150g walnuts
50g almonds, toasted 
250g dried dates, chopped
100g dried apricots, chopped
50g chopped crystallised ginger
1 or 2 Tblsp brandy
1 Tblsp honey
2 tsp mixed spice

Put half of the nuts into the bowl of your food processor and pulse until fairly finely ground. Add the rest of the ingredients and process until well combined and the mixture starts to come together.

Remove the mixture from the food processor and, using wet hands, form into logs about 1 or 2 inches in diameter. I made 5 short logs from this recipe. Wrap the logs in clingfilm and chill in the fridge to firm up. Wrap the clingfilm enclosed logs in decorative paper and include in a hamper of other delicious savoury treats. Ensure the logs are kept cold/refrigerated. These logs will keep in the fridge for up to a month.


Savoury Cheese Biscuits

100g butter, chilled and diced
100g strong Cheddar
100g plain white or wholemeal flour

Preheat your oven to 200C/180C Fan. Line 1 or 2 baking trays with non-stick baking paper.

Put the butter, cheese and flour into a food processor and process until the mixture forms a stiff ball of dough.

On a lightly floured surface, roll the dough into a log about 2 inches in diameter then wrap in clingffilm and chill in the fridge for half an hour or until you are ready to bake the biscuits.  

Cut 1/2cm slices off the biscuit dough log and put them on your prepared trays, allow a little room for them to spread.

Bake in your preheated oven for 12-15 minutes or until golden and crisp.  Leave the biscuits to cool on the trays for a couple of minutes then carefully transfer onto a wire rack to cool completely.  Store the biscuits in an airtight container.  The cooked biscuits can also be frozen.


*I was compensated for my time, expertise and ingredients when creating these recipes*

Easy Christmas Cake Balls

Saturday, 1 November 2014
I was asked by the lovelies at Sainaburys to come up with an easy edible Christmas gift recipe.  I've been making these Christmas cake balls for a few years now and they are very simple to make but look rather impressive.  My 3 girls enjoy making them, there's no cooking involved apart from melting chocolate, the rest of the process is just assembling and decorating.

You can use homemade Christmas cake or store bought, whichever you prefer.  All the decorating supplies are readily available too.  I normally use Green and Blacks Maya Gold chocolate if giving these to adults as it adds a lovely spice and flavour, if giving to children I usually use either milk chocolate or a 60% dark chocolate.

I top my Christmas cake balls with a little white and red sugarpaste to make them look like Christmas puddings but you could decorate them however you like.  I've rolled them in finely chopped nuts or shavings of chocolate previously and they went down very well indeed.


Easy Christmas Cake Balls

400g Christmas cake
1 cup chocolate buttercream or melted chocolate
extra melted chocolate for dipping
white and red sugarpaste
red edible glitter

Crumble the Christmas cake into a bowl and add enough buttercream or melted chocolate to moisten the crumbs so they hold together if you try and shape them into a ball.  You don't want the mixture to be too wet.

Form the mixture into balls then put them on a tray lined with non-stick baking paper.  Chill in the fridge to firm up.  Roll out the white sugarpaste on a surface lightly dusted with icing sugar and cut out small white flower shapes with a cutter.  Roll small portions of red sugar paste into balls and then roll in edible glitter.

Melt the chocolate, either in a microwave or in a bowl over a saucepan of simmering water, then dip the balls in the chocolate and return to the chilled tray.  Top with the white and red sugarpaste decorations before the chocolate sets as this will adhere them to the cake balls.  Leave to set at room temperature or chill in the fridge for a short time if you are in a hurry.  These are best eaten within 3 days of making them.


*I was compensated for my time, expertise and ingredients when creating this recipe*

Extra Veg - June Round-up

Tuesday, 1 July 2014
I hosted Extra Veg in June which is a blogging challenge created by myself and Helen from Fuss Free Flavours as a way to encourage us all to incorporate more vegetables into our meals.

There were lots of fabulous entries, thanks to all who linked up and took part!


Miso-tamarind roasted potatoes wedges with locally sourced, garden salad items

Juggle Mum created a Pasta 'Fakeaway' using courgettes instead of pasta to make a scrumptious quick lunch. 

vegetable ribbon 3 cheese 'pasta' fakeaway

The Taste Space made some delicious Laotian Larb Tofu Lettuce Wraps, a very tasty and healthy vegan dinner.

Laotian Tofu Larb Lettuce Wraps

Green Gourmet Giraffe baked Apple and Pumpkin Pastries with Spiced Red Wine, a fab dessert for a dinner party or special treat. 


The co-creator of this challenge, Helen from Fuss Free Flavours, made Warm Butternut Squash Salad with Dukkah Crunch.  A flavourful and healthy lunch or light supper.


Camilla from Fab Food 4 All created a delicious Prawn Curry, perfect for a family supper.


Searching for Spice made a light, flavoursome and healthy Turkey Chilli perfect for summer.


Sarah from Maison Cupcake created a super healthy, very quick and delicious Kermit Soup which was a gorgeous vibrant colour.

Raw green soup with cavolo nero, coconut and butternut squash Vitamix recipe

Caroline made a tasty Posh Cheese on Toast for a substantial lunch treat.


Eat Your Veg bravely cooked an Easy Peasy Vegetable Stir Fry with a class of KS1 children.


The co-creator of this challenge, Helen from Fuss Free Flavours, made a Chocolate Hazelnut Green Smoothie.  A great way to start the day, or a healthy and tasty afternoon pick me up.


Choclette created Chocolate Bean Burgers with Hot Chilli Sauce, a fab summer dinner guaranteed to wake up your tastebuds.


Camilla made a Roasted Tomato, Red Pepper and Chorizo Soup.  A delicious vibrant soup packed with flavour.


Extra Veg in July is being hosted by Juggle Mum so head over and link up your sweet or savoury recipes that feature vegetables.

Merry Christmas!

Tuesday, 24 December 2013

As I type this post it is already Christmas Day in my homeland of New Zealand.  We're counting down to Christmas Day here in the UK, spending Christmas Eve afternoon playing board games and relaxing before the festivities tomorrow.

I would like to wish all my readers a Merry Christmas from myself and my family.  Our thoughts and prayers are with you should you be missing loved ones for whatever reason, love and and hugs to all those who find this time of year difficult.

I shall be taking a break from blogging over Christmas to spend time with my family and work shifts at my other job.  Stay safe, try not to stress and remember it's experience rather than expense that is most remembered.


Our Christmas Gingerbread House

Monday, 23 December 2013
We bake and decorate a Gingerbread House each year over Christmas and this year it was the last thing I baked in our condemned oven last night before it was replaced with a shiny new one this morning.  

It was decided that all the windows of the house would be different colours and shapes, definitely a non-conformist Gingerbread House this time.  To get the Gingerbread House assembled more quickly I stuck it together with molten sugar instead of royal icing.  


My 3 girls used royal icing to attach all the sweets and decorate the house.


After all the sweets and most of the icing had been used up they had finished!


Gingerbread House/Biscuit Recipe

125g softened butter
110g light soft brown sugar
125ml golden syrup or treacle
1 free range egg yolk
375g plain flour
1 Tblsp ground ginger
1 tsp mixed spice
1 tsp bicarbonate of soda
Crushed boiled sweets

Preheat your oven to 180C/160C Fan.  Line three oven trays with non-stick baking paper.  Using a hand held electric mixer or stand mixer, beat the butter and sugar until pale and creamy.  Add the golden syrup or treacle and beat until completely incorporated.

Sift over the flour, spices and bicarb then mix until combined.  Form the dough into a round, wrap in clingfilm and chill in the fridge for at least half an hour.

Roll out the dough on a lightly floured surface to a 5mm thickness.  Cut out shapes using a template or cookie cutters.  We used cookie cutters to cut window shapes out of the wall pieces and filled them with crushed boiled sweets before baking.  

Bake for 10 - 15 minutes until golden and firm to the touch.  Cool on the trays for a few minutes then carefully transfer to a wire rack to cool completely.

The front of our Gingerbread House

The back of our Gingerbread House

Mini Christmas Cakes

Saturday, 21 December 2013

I made these to put in our Homemade Christmas Hampers, they have the flavour of Christmas Cake but are much lighter and easier to make.  My husband, who normally dislikes fruitcake, declared them to be delicious.  These Mini Christmas Cakes are a delicious treat for a festive afternoon tea, keep some on hand for unexpected visitors or for a sneaky snack with a cuppa.

Mini Christmas Cakes - Makes 10

100g softened butter
110g light soft brown sugar
2 tsp vanilla bean paste or vanilla extract
2 free range eggs
2 Tblsp brandy or orange juice, I used Cherry Brandy
75g self raising flour
2 tsp mixed spice
160g sultanas
170g dried cranberries

Preheat your oven to 160C and line 10 holes of a 12 hole muffin tin with paper cases.

Cream the butter and sugar until pale and fluffy.  Add the vanilla, egg, orange juice or brandy and mix until completely incorporated.  Sift over the flour and spice and gently fold through with the fruit until you have a smooth mixture.  Try not to over-mix or beat the mixture or your cakes will be heavy.

Spoon the mixture evenly into the paper cases and smooth the top. Bake for 25 - 30 minutes or until a skewer inserted into the middle of the cakes comes out clean.  Cool in the tin for a few minutes before transferring to a wire rack to cool completely.  

We iced ours with a simple icing sugar and water icing and decorated them with store bought decorations.


Stained Glass Christmas Biscuits

Friday, 20 December 2013
I bake these biscuits every year, to decorate our tree and to give as gifts.  They are so easy to make, look very festive and always go down well.  My daughters love giving these to their friends with a homemade Christmas card attached, they seem to suddenly have rather a lot of friends this time of year.


Stained Glass Christmas Biscuits 

175g butter, softened
100g caster sugar
2 tsp vanilla bean paste
1 tsp ground cinnamon
225g plain flour
1 pack boiled sweets, I used a supermarket value brand

Preheat your oven to 160°C/140°C Fan/Gas Mark 3.  Line two baking sheets with non-stick baking paper.

Put the butter and sugar into a bowl and, using a stand mixer or hand held electric beater, beat until pale and smooth.  Add the flour and mix to bring the dough together by hand.

Wrap the dough in cling film and leave to rest and chill for half an hour in the fridge.  Take the dough out of the fridge and roll out on a lightly floured work surface using a rolling pin until the dough is 0.5cm thick.

Use a large Christmas themed cutter to cut shapes from the dough.  Use a smaller cutter to cut out shapes from the middle of the larger shapes.  Make sure you leave at least a 1cm border of biscuit dough around the edge of each cut out inner shape.

Put the cut out biscuits on to the prepared trays.  Separate the boiled sweets into colours and each colour into a separate plastic bag.  Finely crush using a rolling pin.  Sprinkle the crushed sweets into the cut out sections of each biscuit ensuring the whole shape is filled in.  If you want to hang the biscuits make a small hole in the border of each biscuit before baking with a skewer or drinking straw. 

Bake in your preheated oven for about 12-15 minutes or until the biscuits are pale golden, the sweets melted and the edges are just starting to turn golden.  Leave to cool on the trays for 5 - 10 minutes then transfer to a wire rack to cool completely.


Sugared and Spiced Nuts - Two Ways

Thursday, 19 December 2013

These are a fab last minute gift or Christmas nibbles idea, simple and really moreish.  I used Kilner Jars to package mine as the jars keep the contents really fresh and are handy for so many things once the contents have been eaten. 

Sugared and Spiced Nuts - Saucepan Method

350g mixed nuts
220g caster sugar
250ml water
1 tsp ground cinnamon

Line a large baking tray with non stick baking paper.  Combine all the ingredients in a saucepan.  Stir over a low heat until the sugar has completely dissolved.

Bring to the boil.  Boil steadily, uncovered, for 10 minutes.  After 10 minutes, start to stir the mixture, keep stirring until the sugar crystallises around the nuts.  Turn out on to the prepared tray and leave to cool before separating the nuts and storing in airtight jars or packaging in cellophane bags.


Sugared and Spiced Nuts - Easy Oven Method

100g icing sugar
2 tsp ground cinnamon
350g mixed nuts

Preheat your oven to 180°C/160°C Fan.  Line a large baking tray with non stick baking paper.

Combine the icing sugar and cinnamon in a bowl.  Put the mixed nuts in a colander and thoroughly rinse under cold water.  Tip the wet nuts onto the prepared baking tray.  Sift the cinnamon and icing sugar mixture over the nuts and toss them until they are well coated.

Roast the nuts for about 20 minutes, tossing once or twice, until fragrant and browned.  Cool on the tray.  Separate the nuts and store in airtight jars or package in cellophane bags.


Back to Top