Powered by Blogger.
Showing posts with label Sweets. Show all posts

Chocolate Mud and Caramel Easter Cake

Sunday, 29 March 2015
This Easter Waitrose are encouraging people to be ‘Good Eggs’.  During the Easter school holidays, Waitrose are asking people to share their Easter photos on social media - from all the delicious food they’re enjoying to fun Easter egg hunts with the kids – using the hashtag #GoodEgg to support Great Ormond Street Hospital Children’s Charity.

Throughout the initiative, Waitrose will be surprising and delighting lucky participants with Easter gifts, including Heston’s Golden Easter Eggs, hampers, cases of wine, Waitrose vouchers and Waitrose Cookery School vouchers.

Waitrose will also be making a charitable donation to Great Ormond Street Hospital Children’s Charity, as well as delivering chocolate eggs for the children to enjoy at their Easter party.

For ideas, inspiration and recipes, Waitrose have created a dedicated Easter section online to help you plan the perfect Easter and have a Kids Easter ideas page here which has step by step guides to creating your own DIY Easter eggs and other edible Easter treats.

I decided to bake a 4 layer Chocolate Mud and Caramel Easter Cake which my children dubbed the Epic Easter Cake when they saw it after they had arrived home from school and spied the cake on our kitchen counter.

The cake is best served in thin slices as it is very rich and a proper sugar rush.  I was thankful that the weather was good as I sent the kids outside to play after taste testing as it was like rocket fuel as an after school snack.


Chocolate Mud Easter Cake

225g butter, cubed
360g dark chocolate, roughly chopped (I used Green and Blacks)
165g light soft brown sugar
180ml water
150g plain flour
35g self raising flour
2 Tblsp cocoa powder
2 medium free range eggs

Preheat your oven to 180C/160C Fan.  Grease and line a 22cm/9 inch cake tin, ensuring the paper comes 2 inches/5cm above the top edge of the cake tin.

Combine the butter, chocolate, sugar and water in a saucepan over a low heat.  Stir until mixture is smooth.  Cool this mixture until it reaches room temperature.  Mix in the flours, cocoa and eggs.  

Bake for 1 hour to 1 hour 15 minutes until cake is cooked and a skewer inserted into the centre comes out clean.  Cool the cake in the tin for 15 minutes to half an hour before turning out on to a wire rack to cool completely.

Split the cake horizontally into 4 layers. Alternate ganache and caramel between layers, finishing with ganache on the top of the cake.


Chocolate Ganache


300g dark chocolate, I used Green and Blacks
200ml double cream

Put the cream in a saucepan over a moderate heat. Heat until almost boiling, remove from the heat and stir through the chocolate until a smooth mixture forms. Leave the ganache to cool until it reaches a spreadable consistency.


Caramel

50g butter or margarine
50g light muscavado sugar
1 x 397g tin condensed milk

Measure the butter and sugar into a pan and heat gently until the sugar has dissolved. Add the condensed milk and stir until completely combined.  Bring the mixture to the boil.  As soon as the mixture boils turn the heat right down so the mixture simmers very slowly.  Ensure you stir the mixture continuously.  Heat for about 5 minutes or until the mixture thickens slightly. Pour into a bowl and leave to cool until it is a spreadable consistency.  


I've had feedback from a couple of people who have baked the cake recipe above that the cake didn't rise enough and they couldn't cut it into layers.  I tested the above recipe three times before blogging it and it worked fine for me each time, including for my 12yo's birthday.  In an effort to ensure that everyone who wants to bake a cake like this can do so, here's another chocolate cake recipe which I have baked more than a dozen times that should be fail safe.  

Chocolate Layer Cake

200g self raising flour
50g cocoa powder
125g softened butter
1 tsp vanilla bean paste or 2 tsp vanilla extract
275g caster sugar
2 large free range eggs
160ml lukewarn water

Preheat your oven to 180C/160C Fan.  Grease and line a 22cm/9 inch cake tin, ensuring the paper comes 2 inches/5cm above the top edge of the cake tin.

Put all the ingredients into a large bowl and beat with a stand mixer or electric hand held beaters until mixture is smooth.  Beat for 3 to 5 minutes until the mixture is lighter in colour.  Pour mixture in to prepared cake tin and level the top.  

Bake for 1 hour to 1 hour 15 minutes until cake is cooked and a skewer inserted into the centre comes out clean.  Cool the cake in the tin for 15 minutes to half an hour before turning out on to a wire rack to cool completely.

Split the cake horizontally into 4 layers. Alternate ganache and caramel between layers, finishing with ganache on the top of the cake.


** I was compensated for my time and expertise devising this recipe for Waitrose **

Chocolate Overload Slice

Saturday, 24 January 2015
This slice is the invention of my 8yo, she made it when we had our After School Club session last week.  It is great to be able to spend time with her and watch her bake, make or craft whilst having a chat.
We started with a Tiffin base then added a layer of marshmallows followed by a layer of melted chocolate then sprinkles.  Everything sweet and baked needs sprinkles, it's the law, so says 8yo. Who am I to disagree?


Chocolate Overload Slice

4 Tblsp golden syrup
125g butter
250g shortbread finger biscuits
4 Tblsp cocoa powder
75g raisins
200g pack marshmallows
250g plain chocolate, roughly chopped

We used a microwave to make this slice, you could use a bowl set over a saucepan of simmering water instead.  Measure the golden syrup and butter into a large pyrex jug or non-metallic bowl.  Melt in the microwave on full power for about 1.5 - 2 minutes in 30 second bursts.  

Whilst the butter and syrup are melting, put the biscuits into a plastic bag, seal it and gently crush the biscuits.  You want small chunks of biscuit, not totally crushed to crumbs, so don't be too vigorous.  

Once the butter and golden syrup have melted, mix them together until totally combined.  Then add the cocoa and mix until completely incorporated.  Finally mix in the raisins and the crushed biscuits.

Pour the mix into a lined tin and spread it out evenly then level the surface.  Put the marshmallows into a microwave safe bowl or jug and heat on full power for about 45 seconds until melted.  Pour over the tiffin base.

Finally, heat the chocolate in the microwave in 30 second bursts for a total of 2 - 3 minutes until melted.   Alternatively you could put the chocolate in a bowl set over a saucepan of simmering water and stir until melted.  

Pour the melted chocolate evenly over the melted marshmallow layer and carefully spread it out to completely cover the slice.  Sprinkle over some sugar stars or other sprinkles if you want.

Put the tiffin in the fridge for at an hour to set.  Cut into small squares to serve.


Chocolate Energy Balls

Friday, 16 January 2015
I've been trying to come up with snacks that aren't baked treats and can be whipped up by the kids, and withstand being in the kids lunchboxes.  Here's one of the recipes we came up with.  It is so easy! Just bung everything into a food processor or power blender and whiz it together.

Chocolate Energy Balls


200g dates
200g unsalted mixed nuts
200g dark/plain chocolate, melted
desiccated or shredded coconut, for coating

Put everything, except the coconut, into the bowl of a food processor or power blender and blitz until a smooth paste forms.  Using damp hands roll heaped teaspoonfuls of the mixture into balls and then roll into the coconut.  We made approximately 25 balls from this mixture.

Put the balls onto a lined baking tray and then refrigerate for 2 hours or until firm.  These keep in the fridge, in a snap lock bag, for a few days.  


Gingerbread Houses

Tuesday, 16 December 2014
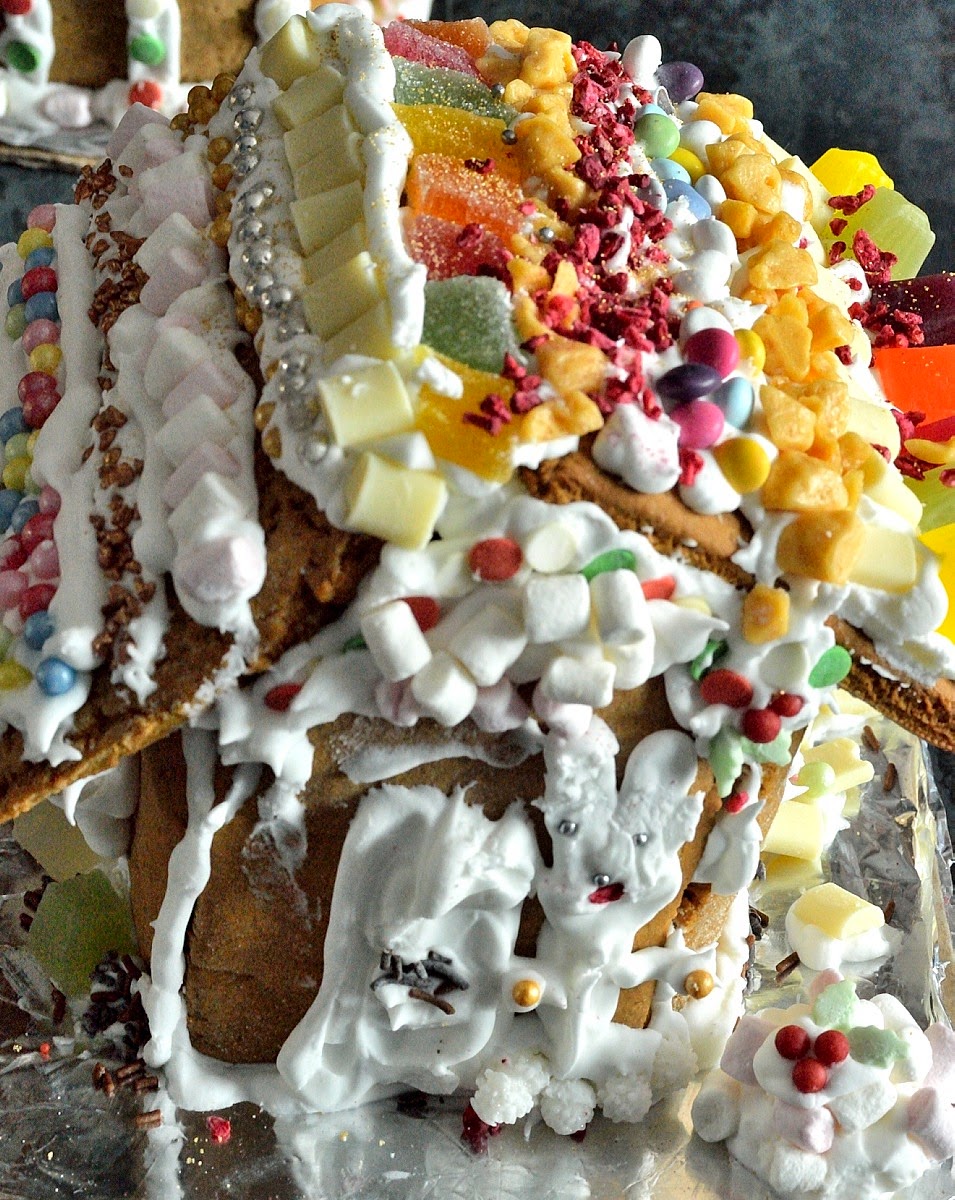
As is a festive tradition in our house, gingerbread houses were made and decorated.  This year instead of one big house that all of us work on, each of my 3 daughters made their own.  It kept them busy for a long time.  They all made their own dough, cut out the templates, baked the dough then assembled and decorated their houses.

They used the dough recipe from this post and some of our rather impressive sprinkles collection.


Do you make gingerbread houses over the festive season? Are there any traditional bakes that you make with/for your family this time of year?

Easy Christmas Cake Balls

Saturday, 1 November 2014
I was asked by the lovelies at Sainaburys to come up with an easy edible Christmas gift recipe.  I've been making these Christmas cake balls for a few years now and they are very simple to make but look rather impressive.  My 3 girls enjoy making them, there's no cooking involved apart from melting chocolate, the rest of the process is just assembling and decorating.

You can use homemade Christmas cake or store bought, whichever you prefer.  All the decorating supplies are readily available too.  I normally use Green and Blacks Maya Gold chocolate if giving these to adults as it adds a lovely spice and flavour, if giving to children I usually use either milk chocolate or a 60% dark chocolate.

I top my Christmas cake balls with a little white and red sugarpaste to make them look like Christmas puddings but you could decorate them however you like.  I've rolled them in finely chopped nuts or shavings of chocolate previously and they went down very well indeed.


Easy Christmas Cake Balls

400g Christmas cake
1 cup chocolate buttercream or melted chocolate
extra melted chocolate for dipping
white and red sugarpaste
red edible glitter

Crumble the Christmas cake into a bowl and add enough buttercream or melted chocolate to moisten the crumbs so they hold together if you try and shape them into a ball.  You don't want the mixture to be too wet.

Form the mixture into balls then put them on a tray lined with non-stick baking paper.  Chill in the fridge to firm up.  Roll out the white sugarpaste on a surface lightly dusted with icing sugar and cut out small white flower shapes with a cutter.  Roll small portions of red sugar paste into balls and then roll in edible glitter.

Melt the chocolate, either in a microwave or in a bowl over a saucepan of simmering water, then dip the balls in the chocolate and return to the chilled tray.  Top with the white and red sugarpaste decorations before the chocolate sets as this will adhere them to the cake balls.  Leave to set at room temperature or chill in the fridge for a short time if you are in a hurry.  These are best eaten within 3 days of making them.


*I was compensated for my time, expertise and ingredients when creating this recipe*

Dead Easy Desserts Round Up - March

Tuesday, 1 April 2014

I am delighted to be hosting Dead Easy Desserts in April, however I need to show you all the fabulous entries that linked up in March first.

Pistachio and Raspberry Meringues from A Little Bit Greedy


Chocolate Crepes filled with an Avocado-Mint Cream from The Taste Space

Raw Grasshopper Crepes (Carob Crepes filled with a Avocado-Mint Cream)


Chocolate Coconut Mousse from My Golden Pear

Chocolate Coconut Mousse 2


French Toast with Sheep Milk Mousse and Balsamic Strawberry Jam from Cooking Around The World


Microwave upside pineapple cake


Mango Crunch Fool from Anne's Kitchen


Thanks so much to all those who linked up their delicious dessert creations.  Don't forget to join in with the April blog hop, post coming soon!

11yo's Birthday Cake - How to save a cake that's sunk in the middle

Saturday, 22 March 2014

I have a confession to make.  I had a major minor baking disaster with my 11yo's Birthday Cake.  I forgot to test it was properly cooked with a skewer when it came out of the oven.  It wasn't quite done and as it started to cool it started to sink in the middle.  I then realised my mistake and put it back in the oven until it was properly cooked but the cake still ended up with a one inch deep dent in the middle.  It looked like a great big chocolate cake crater.  I may have had a mildly hysterical moment at this point.

I didn't have the ingredients, energy or time to make another so had to work with what I had.  I decided to be a bit cunning and use sweets to fill the large crater so nobody would know and I would look like a genius Super Mum for hiding sweets in her cake.  I spread a layer of chocolate ganache, or you could use buttercream over the entire outside of the cake and a thin layer of ganache in the crater to hold the sweets in place.  I then filled the crater with smarties and finished with a layer of chocolate buttons flat side up to provide a flat surface to ice the cake with.  A reasonably thick layer of ganache was carefully spread over the top of the cake, including over the sweets and chocolate buttons.  The cake was then chilled in the fridge overnight so the ganache was really firm which made coating the cake in sugarpaste much easier.


I coated the cake in bright blue sugarpaste and covered it with sugarpaste flowers and buttons, as per my daughters labelled illustration she had given me to work from.  I used this Chocolate Cake recipe to bake the cake.  I baked another Chocolate Cake using that today, made sure I tested it was cooked through after baking, and the cake baked perfectly so I think the sunken cake disaster was a one off, thankfully.


Hidden Easter Egg Cupcakes

Saturday, 15 March 2014


Easter is on the horizon and I have been planning my baking and experimenting, creating new tasty treats to devour.

Cupcakes are great for tailoring to occasions as they are so versatile in both flavourings and decoration options.  I decided to hide an Easter egg inside each cupcake, and also top them with some mini eggs for a full on chocolate hit.

The cupcakes were enthusiastically devoured by my husband and children.  A word of warning, there is A LOT of chocolate in the cupcakes and they are like rocket fuel. A trip to the park to burn off the sugar rush was essential yesterday afternoon.

Hidden Easter Egg Cupcakes

150g butter, softened
165g light soft brown sugar
1 tsp vanilla extract
2 free range eggs
150g self-raising flour
50g cocoa powder
180ml natural yoghurt
10 – 12 mini Easter Eggs

Preheat your oven to 180C/160C Fan.  Line a 12 hole muffin tin with paper cases.

Use electric beaters to cream the butter, sugar and vanilla together in a bowl until pale and fluffy.  Add the eggs, one at a time, beating well after each addition.  Gently but thoroughly fold in the flour, cocoa powder and yoghurt until completely combined.

Spoon two-thirds of the mixture evenly into the paper cases.  Gently press a mini caramel Easter Egg or Creme Egg half way into the mixture in each paper case.  Divide the remaining mixture between the paper cases, ensuring the Easter Egg is completely covered by cupcake batter.  The paper cases will be fairly full.

Bake for 20-25 minutes, the top of each cupcake should spring back when lightly pressed.  Cool in the muffin tin for 5 minutes before transferring to a wire rack to cool completely.


Pipe or spread chocolate buttercream over the top of the cupcakes and garnish with chocolate mini eggs if you wish.


I'm linking this recipe with the Get Your Craft On Challenge, a fab monthly craft event, hosted this month by Missie Lizzie over on Me and My Shadow.  The theme this month is Chicks and Eggs, perfect for Easter planning!

Our Christmas Gingerbread House

Monday, 23 December 2013
We bake and decorate a Gingerbread House each year over Christmas and this year it was the last thing I baked in our condemned oven last night before it was replaced with a shiny new one this morning.  

It was decided that all the windows of the house would be different colours and shapes, definitely a non-conformist Gingerbread House this time.  To get the Gingerbread House assembled more quickly I stuck it together with molten sugar instead of royal icing.  


My 3 girls used royal icing to attach all the sweets and decorate the house.


After all the sweets and most of the icing had been used up they had finished!


Gingerbread House/Biscuit Recipe

125g softened butter
110g light soft brown sugar
125ml golden syrup or treacle
1 free range egg yolk
375g plain flour
1 Tblsp ground ginger
1 tsp mixed spice
1 tsp bicarbonate of soda
Crushed boiled sweets

Preheat your oven to 180C/160C Fan.  Line three oven trays with non-stick baking paper.  Using a hand held electric mixer or stand mixer, beat the butter and sugar until pale and creamy.  Add the golden syrup or treacle and beat until completely incorporated.

Sift over the flour, spices and bicarb then mix until combined.  Form the dough into a round, wrap in clingfilm and chill in the fridge for at least half an hour.

Roll out the dough on a lightly floured surface to a 5mm thickness.  Cut out shapes using a template or cookie cutters.  We used cookie cutters to cut window shapes out of the wall pieces and filled them with crushed boiled sweets before baking.  

Bake for 10 - 15 minutes until golden and firm to the touch.  Cool on the trays for a few minutes then carefully transfer to a wire rack to cool completely.

The front of our Gingerbread House

The back of our Gingerbread House

Sugared and Spiced Nuts - Two Ways

Thursday, 19 December 2013

These are a fab last minute gift or Christmas nibbles idea, simple and really moreish.  I used Kilner Jars to package mine as the jars keep the contents really fresh and are handy for so many things once the contents have been eaten. 

Sugared and Spiced Nuts - Saucepan Method

350g mixed nuts
220g caster sugar
250ml water
1 tsp ground cinnamon

Line a large baking tray with non stick baking paper.  Combine all the ingredients in a saucepan.  Stir over a low heat until the sugar has completely dissolved.

Bring to the boil.  Boil steadily, uncovered, for 10 minutes.  After 10 minutes, start to stir the mixture, keep stirring until the sugar crystallises around the nuts.  Turn out on to the prepared tray and leave to cool before separating the nuts and storing in airtight jars or packaging in cellophane bags.


Sugared and Spiced Nuts - Easy Oven Method

100g icing sugar
2 tsp ground cinnamon
350g mixed nuts

Preheat your oven to 180°C/160°C Fan.  Line a large baking tray with non stick baking paper.

Combine the icing sugar and cinnamon in a bowl.  Put the mixed nuts in a colander and thoroughly rinse under cold water.  Tip the wet nuts onto the prepared baking tray.  Sift the cinnamon and icing sugar mixture over the nuts and toss them until they are well coated.

Roast the nuts for about 20 minutes, tossing once or twice, until fragrant and browned.  Cool on the tray.  Separate the nuts and store in airtight jars or package in cellophane bags.


Chocolate Fudge

Wednesday, 4 December 2013

My husband loves chocolate fudge and I do make it during the year not just in the run up to Christmas.  I do make quite a few batches to give as gifts as once you get the hang of making it you can whip up batches quite easily and it makes a tasty and thrifty gift.

I was sent some chocolate by Sainsbury's to review so used some in the fudge.  It gave the fudge a rich chocolaty flavour.


Chocolate Fudge

397g tin sweetened condensed milk
100g butter, cut into cubes
250g light soft brown sugar
1 Tblsp golden syrup or honey
100g milk or dark chocolate, finely chopped

Grease and line a 20cm square with non-stick baking paper.

Put the condensed milk, butter, brown sugar and golden syrup into a heavy based saucepan set over a low heat

Heat gently until the sugar has dissolved.  Increase the heat slightly and bring the mixture to the boil  Don’t turn up the heat too high or the mixture will burn.  Once the mixture is boiling, simmer for 10-15 minutes, stirring continuously and scraping the base of the pan.  Take care while the mixture boils and during stirring as the fudge will be very hot.

To test whether the fudge is ready check with a sugar thermometer that the fudge has reached 118°C.  Alternatively. drop a little of the mixture into a cup of ice-cold water.  A soft ball of fudge should form.

Once the fudge has boiled long enough, take it off the heat and add the finely chopped chocolate.  Stir until smooth and well combined.  Beat the fudge until very thick, it loses the glossy sheen and it is starting to set.  This can take up to 10 minutes with a wooden spoon.  I use a hand held electric mixer on a very low speed for 5 minutes.  Pour the fudge into the prepared cake tin.  Put the cake tin onto a trivet and chill in the fridge for 1 hour or until firm.  Cut the fudge squares as you would like them then package them to give as gifts.  Always remember to taste test some yourself!


I'm joining in the festive photo fun with No Croutons Required hosted by Jac over on Tinned Tomatoes.


I'm entering this recipe into Tea Time Treats, it is Kate's last month hosting this blog challenge, but I am sure Karen will announce her new co-host next year.  The theme is Festive Foodie Gifts.


Summer Berry Tarts

Thursday, 27 June 2013


I baked these delicious morsels in an effort to cheer myself up whilst battling the lurgy.  They are delicious, slightly faffy to make, but really worth the effort.  You could use any berries you like, I just  happened to have rather a lot of strawberries to use up.

I used the shortcrust pastry recipe from this post, feel free to use shop bought pastry or a ready made pastry case.  I also used redcurrant jelly from a bottle given to me at a recent food blogger event. If you don't fancy making crème patisserie just use a really thick custard, either homemade or store bought.

Crème Patisserie

3 free range egg yolks
20g plain flour, sifted
65g caster sugar
250ml milk
1 or 2 tsp vanilla bean paste

Put the egg yolks, flour and 2 tablespoons of the sugar in a bowl and whisk until thick and pale.  Combine the milk, remaining sugar and vanilla bean paste in a saucepan and bring to the boil over a medium heat.  Strain through a sieve into the beaten egg mixture.  Pour the mixture back into the saucepan and cook over low heat for 2-3 minutes, stirring constantly, until thickened.  Remove from the heat and leave to cool completely.  If you put a clingfilm on the surface of the crème it will stop a skin forming on the surface.

Assembling the Summer Berry Tarts

I made the Crème Patisserie and left it to cool completely then kept it in the fridge until I was ready to use it.

I lined 4 loose based mini quiche tins with shortcrust pastry then blind baked them until the pastry was golden and completely cooked through.  Once the tart cases had cooled completely I brushed the inside with a little melted chocolate to stop the pastry from going soggy once the tarts were filled.

Put enough crème patisserie into each tart case to 2/3 fill it.  Lay the strawberries on top.  Gently heat the redcurrant jelly until smooth, brush/pour over the berries then leave to set.


I am submitting these tarts to the Classic French Challenge by Jen from Blue Kitchen Bakes.


I'm also submitting my Summer Berry Tarts to Simple and In Season the monthly blogging linky from Ren Behan.


A Very Special 13th Birthday Cake

Sunday, 28 April 2013
My eldest daughter turned 13 and wanted to bake and decorate her own cake.  She is giving me some competition!  Her chocolate cake was covered in ganache then the top was decorated with chocolate beans, including her initial, before the sides were covered in dark and milk chocolate fingers.  She definitely shares the chocolate addiction that my husband has!

The cake was baked using this recipe and she baked, decorated and photographed the cake herself.  I am SO proud of her!


I think my 13yo could run a business selling these to her friends!  Perhaps it will be a future pocket money earner for her.


Fondant Fancies

Sunday, 17 March 2013


My 12yo was home from school recovering from a cold and nagged mercilessly to be able to make Fondant Fancies.  I decided to give her free reign in the kitchen to create these rather fiddly and messy delights.  The fondant icing is tricky, getting the right consistency is a real faff.  Other than that it is mainly an assembly line job with patience needed for the various fridge chilling stages.

She used a "bung it all in" method to make the sponge.  I will now hand over blogging the rest of the recipe over to her:


Fondant Fancies

For the sponge:

225g self-raising flour
225g baking spread or softened butter
225g caster sugar
4 large free-range eggs
1 tsp vanilla extract

Preheat your oven to 160C/Gas Mark 3.  Grease and line a 20cm square tin with non-stick baking paper or a paper liner.

Measure all the sponge ingredients into a bowl and beat until smooth. I used a standmixer.  Pour the cake mixture into the tin and level the top.

Bake for about 40 minutes, or until a skewer inserted into the centre comes out clean.  Leave the cake to cool in the tin for 10 minutes, then turn out onto a wire rack to cool completely.  Once completely cool cut into 25 evenly sized squares.  Put the sponge squares in the fridge for half an hour to firm up while you make the buttercream.  This makes the sponge less fragile when you are spreading the buttercream onto it. 

For the buttercream:
250g/9oz unsalted butter, softened
200g/7oz icing sugar

Beat together the softened butter and icing sugar in a bowl until pale and smooth.  Put some of the buttercream in a piping bag and put in the fridge to chill, you'll need this to make the blobs on the top.

Use the rest of the buttercream to spread on the sides and top of each sponge square.  Pipe a blob on to the top of each buttercreamed sponge square.  Put the buttercream coated sponge pieces into the fridge to chill for at least half an hour.  This will make sure the buttercream is firm and stop it from melting when you are dipping the fancies.

For the fondant:
500g solid sugarpaste/fondant icing
75ml/5 Tblsp water

Cut the fondant icing into small pieces.  Put in a standmixer and use a paddle attachment.  Turn on, usng a low speed, mix until the sugarpaste starts to be broken down then gradually add the water one tablespoon at a time while constantly mixing.  The icing will become smooth and form a thick liquid.  Add flavoured extracts and/or gel colours at this point.  

Take the cakes out of the fridge and tidy up the buttercream if you need to with a warm knife.  Put a sponge square onto a fork, make sure the fork is at a slight angle. Dip each square into the icing the carefully put it onto a cooling rack with a tray underneath to catch any drips of fondant.  Keep dipping the sponges one at a time until they are all coated in fondant.  Leave to set on the tray.  Don't put them in the fridge to set or the fondant won't dry with a nice glossy finish.  .

You can melt some chocolate in the microwave on medium power in 30 second bursts, stirring after each burst, then pipe it over the fancies to make a stripy pattern.  We used some sugarpaste decorations we had made to decorate some of them too.


The verdict:
Making the fondant fancies took about 3 hours in total.  It was a long process with lots of waiting about for the sponges to chill in the fridge.  I would bake them again but not for a while, I prefer quicker bakes with a lot less stages.  They were delicious  but not really worth the faff it took to make them, especially getting the consistency of the fondant right which was really frustrating.


As 12yo is quite rightly proud of her efforts, and I am a very proud Mum, I'm linking this recipe to #cookitblogit co-hosted by Cass from Frugal Family and Emma from Crazy With Twins.


The Diary of a Frugal Family


I'm also linking this recipe to the Recipe of the Week linky from A Mummy Too.


Link up your recipe of the week

Easy Easter and Spring Baking

Tuesday, 5 March 2013
easter biscuit egg shape

I know it is early March but Easter will be upon us before we know it.  Should you have cake stalls, parties or Easter festivities to bake for - fear not! Here are my top Easter recipes to make and bake. 

Cupcakes

These can be decorated any way you like!  We baked and decorated some cupcakes yesterday afternoon after school with a spring theme.

110g butter or margarine, softened
110g caster sugar
2 free-range eggs, lightly beaten
1 tsp vanilla extract
110g self-raising flour
1-2 Tblsp milk

For the buttercream:
140g butter, softened
280g icing sugar
1-2 Tblsp milk
food colouring

Preheat your oven to 180C/Gas Mark 4 and line a 12-hole muffin tin with paper cases.

Cream the butter and sugar together in a bowl until pale and fluffy.  Beat in the eggs a little at a time whilst continuously beating then add the vanilla extract.  Adding the egg whilst continuously beating the mixture should help it emulsify and not curdle.  If the mixture does start to curdle, add a tablespoonful or two of flour and this will stabilise the mixture whilst you add the rest of the egg.  Fold in the flour, add a little milk until the mixture drops easily off a spoon.  Spoon the mixture evenly into the paper cases.

Bake in the oven for 10-15 minutes, or until golden-brown on top and a skewer inserted into the centre of one of the cakes comes out clean.  Set aside to cool for 10 minutes, then remove from the tin and cool completely on a wire rack.

To make the buttercream icing:
Beat the butter in a large bowl until pale and soft.  Add the icing sugar a little at a time to avoid a dust storm of icing sugar.  One all the icing sugar has been incorporated add one tablespoon of milk and beat until smooth and creamy.  If the buttercream icing is a little too thick add another tablespoon of milk.  Add food colouring and mix until the icing is an even colour.  Pipe or spread the icing on to your cupcakes.


Chocolate Easter Nests

This recipe is brilliant for baking with kids, perfect for Easter cake stalls or parties.  You can use cornflakes instead of rice krispies if you like or a mixture of both.

2 cups rice krispies or cornflakes
200g milk or dark chocolate broken into chunks
Coconut threads/shredded coconut
Yellow food colouring
Chocolate mini Easter eggs

Mix a few drops of yellow food colouring with water until you have the shade of yellow that you want.  Gradually add the food colouring mix to the coconut threads and stir until the coconut threads have absorbed the colour but are not wet.

Break the chocolate into pieces and put in a bowl over simmering water or heat in the microwave in 30 second bursts until just melted.  Reserve 3 or 4 tablespoons of melted chocolate then pour the rest into the rice krispies or cornflakes and stir until they are evenly and totally coated in the chocolate.

Line a muffin tin with paper cases.  Spoon the chocolate coated cereal into the paper cases.  Make a slight hollow in the centre with a teaspoon.  Put a little of the yellow coloured coconut into the hollow, then arrange the chocolate eggs on top of the coconut.   Put in the fridge until the chocolate has set.


easter nests no bake


Other handy Easter recipes:

Hot Cross Buns - always popular and you can bake them in bulk and freeze until needed.

Mini Creme Egg or Mini Caramel Egg Muffins and Broken Easter Egg/Chocolate Chunk Cookies  - not just for leftover Easter eggs, you can make them as Easter treats too.

Easter Story Cookies - these have accompanying Bible verses and are fab to share the Easter story with your children.

I would love to see your Easter bakes and treats.  Link up your blog posts to the blog hop linky so we can all see your awesomeness!

easter chick biscuit


Back to Top