Powered by Blogger.

Meal Planning For Beginners

Friday, 30 December 2016
One of the best ways to save money on your grocery costs is to plan your meals. Meal planning can seem overwhelming if you've never done it before, and even more so if you have to stick to a tight budget.

To get the most value for money, you will need to plan meals around what’s already in your pantry, and what's on special offer and/or in season.  Meal planning won’t save you money if you buy expensive cuts of meat, out of season produce, and other expensive items all the time. 

Here are my top tips:

Do a Stocktake and Use What You Have
One of the easiest ways to save money is to plan as many meals as you can using what you already have in your cupboards.  See how many meals you can make using the food you already have, you will probably be surprised at how many meals you can whip up using the ingredients lurking in your cupboards, freezer and fridge.  

Use Less Meat
If you can plan a few meals each week that are meatfree then you are sure to save money.  Try planning meals around cheap proteins like beans/pulses or eggs.  Frozen fish can also be a cost effective option.  You can also bulk out meals with vegetables to make less meat go further.

Cook with Cheap Staple Ingredients
Another great way to save money is to base some meals around inexpensive basic foods such as porridge for breakfast, pearl barley risotto for dinner, and pasta salads for lunches.

Keep Things Simple
I plan simple, easy to prepare meals, that make my life easier as well as save money.  There's nothing wrong with including time saving tasty meals such as twice baked potatoes or beany burritos, frittatas or pasta bakes, and slow cooker vegetable or meat stews.  Include some of your family favourites in the Meal Plan too, there's no point living off lentils for a week if your family won't eat them.  As with most changes to routine, it is easier to cope if things change gradually.  Perhaps introduce one or two new meals a week at first, bulking out your usual meals with more vegetables, then try introducing more new meals each week as time goes on.

Use up your ingredients
If you are buying 1kg of rice, try to plan meals that will use it up that week.  For example, you could use the rice as a side dish one night and then have Fried Rice for dinner another night, and perhaps make rice pudding for dessert or after school snacks.  The same goes for pasta, if you find you have lots of part packets of different shaped pasta, put it in a Minestrone or pasta bake to use it up.  Any stray tins of pulses or lentils can be put into a chilli or bolognese to make it go further and also increase the fibre content of the meal.

Cook From Scratch When You Can
Convenience food has its place, but shouldn’t be relied upon all the time, especially when you’re on a tight budget because it costs more and is usually not the healthiest option. Anything that you can learn to make at home instead of buying it will save you money.  A homemade pasta sauce can be made for pennies, and will contain much more flavour and much less sugar than some commercially made ones.  Herbs and spices can be purchased cheaply in the ethnic food aisle of the supermarket or from local shops, they are also brilliant for buying rice, beans, and some grains in bulk.  A slow cooker is brilliant for making stocks, soups, and stews.  

Make the most of expensive ingredients
For example, if we have a roast chicken for dinner one night, I make another two meals with the leftover cooked chicken and stock with the carcass.  Use good quality sausages, with a high percentage of meat, to flavour a stew that will last a couple nights, or dinner and a couple of lunches.

Love Your Leftovers
We don't waste anything if we can possibly avoid it.  I quite often make double the amount of dinner so we can enjoy a quick dinner later in the week, or freeze it for when we need a quick meal instead of buying a takeaway.  Leftovers are also great for lunches.  If we have small portions of leftover dinner I freeze them in smaller portions for a quick toddler dinner, or in larger portions for teenagers to defrost, reheat and eat, before they dash off to evening clubs.


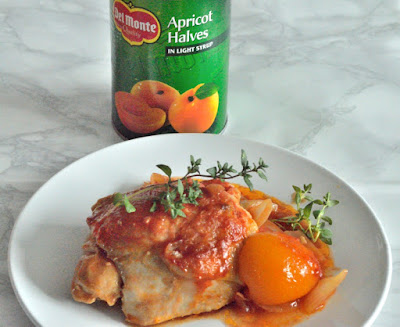
Apricot Chicken

Sunday, 20 November 2016
I was recently asked to create some recipes using delicious tinned fruit, you can check out my delicious dairyfree Tropical Fruit Cake here.  For my savoury recipe creation I decided to make Apricot Chicken, a childhood favourite that my Mum used to make regularly.  She used a packed mix flavour sachet to make hers, and I wanted to see if I could replicate the flavours using store cupboard ingredients.  It took a couple of attempts but I think I managed it, and my family agreed that dinner was delicious.  


This recipe will be added to our Meal Plans for sure, it's flavourful and quick to make, using store cupboard ingredients.  I always have some tinned fruit in our pantry, so handy as it is has a long shelf life, can be one of our 5 a day, and the canning process preserves nutrients from the ripe fruit.

Apricot Chicken 

1 Tblsp Oil
6 chicken thighs, bone in and skin on
2 onions, diced
2 cloves garlic, minced
1 tsp mild chilli powder (use more or less according to your taste)
3 Tblsp tomato paste
2 sprigs fresh thyme, or 1 tsp dried mixed herbs
400g can chopped tomatoes
410g can Del Monte apricot halves in syrup, drained
250ml chicken stock

Heat the oil in a large casserole pan or saucepan and brown the chicken thighs on both sides, remove from the pan and set aside.  Add a little more oil to the pan, if necessary, then cook the onion until soft and starting to turn golden.  Add the garlic and chilli powder and cook for a minute or so.  

Return the chicken to the pan and add the rest of the ingredients.  Stir well to combine then cover and simmer for 20 minutes until the chicken is cooked through.  Uncover then simmer for a further 10 minutes to allow the sauce to thicken.  Serve with mash or rice and mixed vegetables or steamed greens.


For more recipes, information and inspiration, check out Del Monte's website, Instagram and Facebook.

Food Bank Reverse Advent

Wednesday, 16 November 2016
We regularly give supplies to our local Foodbank, usually by adding a few items to our shopping then putting them in the trolley at the collection point in the supermarket.  This festive season I wanted to do something different.  I decided to take part in the Foodbank Reverse Advent, and donating a box of supplies at the end of November.  By donating at the end of November, or early December, it enables the Food Bank to distribute the supplies to those in need before Christmas.

A group of school Mums and I have been putting aside one item each day in November and will be taking our boxes to the local Food Bank at the end of November.  Our local Cambridge City Foodbank also has a Christmas Hamper Appeal which my family and I are also donating groceries to.

The Cambridge City Foodbank want to distribute 200 hampers to needy Cambridge families before Christmas.  So they are seeking 200 people who will fill one hamper each with specific items. If you would like to sign up please email info@ccfb.org.uk


The items needed for the Reverse Advent Christmas Hampers are, one each of the following, in a large carrier bag:

Chocolate Christmas Log or Christmas Cake
Children's Christmas Chocolate (Selection Box)
Fancy Sweet Biscuits
Pringles or similar
Cheesy Biscuits or similar
Nuts
Tinned Ham
Pickles (Sweet)
Tinned Tuna or Salmon
Chicken Paste
Dried Fruit (Apricots, Pineapple, etc)
Salad Cream or Mayo
Jam
Shower Gel or Shampoo
Christmas Crackers

Gather all the items and then drop of them off in the carrier bag on Saturday 10th December from 10am to 2pm OR Tuesday 13th December between 9am and 4pm at:

CCFB Warehouse
Unit 4
Orwell Furlong
Cambridge
CB4 0WY

Please do give to your local Food Bank if you can, even a few items will make a difference.  There are some local festive campaigns running, do contact organisations in your are to see if you can help out and which items they are in need of.


Victoria Sandwich

Friday, 28 October 2016
I baked a Victoria Sponge as a technical challenge for the last episode bake along in the latest series of The Great British Bake Off.  I used the 'all in one' method which makes it such an easy cake to whip up.


My family managed to wait until I had finished taking photos before they pounced on the cake and devoured the lot, I had to be quick taking the photos though as they were hungrily circling.  It went down very well with the hungry hordes and they now want it added to my regular baking sessions.  


Victoria Sandwich

4 large free range eggs
225g/8oz caster sugar
225g/8oz self-raising flour
2 tsp baking powder
225g/8oz baking spread or soft butter at room temperature

To serve:
Jam, I usually use raspberry
Whipped Cream

Preheat your oven to 180C/350F/Gas 4.  Grease and line 2 x 20cm/8in sandwich tins.  Grease the inside of the tin then line the bottom of each of the tins with a circle of non-stick baking paper.  

Break the eggs into a large mixing bowl, then add the rest of the cake ingredients.  Beat with an electric mixer until combined.  Don't over mix the batter, as soon as everything is blended stop mixing.   

Divide the mixture evenly between the tins and gently smooth the surface of the batter.  Place the tins on the middle shelf of the preheated oven and bake for 25 minutes.   The cakes are done when they’re golden-brown and coming away from the edge of the tins. The centre of the cakes should spring back when gently pressed.

Remove the cakes from the oven and set aside to cool in the tins for five minutes.  Turn the cakes out onto a cooling rack that has been covered with a clean tea towel.  This stops the cake tops from being marked by the wire rack.  

Once the cakes have cooled completely you can assemble the sandwich.  Place one cake upside down onto a plate and spread it with plenty of jam then spread over plenty of whipped cream.  Top with the second cake, top-side up.  Dust with icing sugar to serve.  


Giant Chocolate Chip Birthday Cookie

Monday, 17 October 2016
I baked this as an experiment and oh my goodness was it delicious! My daughters said it would be great decorated like a Birthday Cookie that a certain cookie retailer sells.  Baked as one of 10yo's birthday cakes, this giant cookie cost £1.87 to make, without energy and decorating costs.  The High St retailler version costs £14.99 or more depending on your choice of decoration.  My version is 8 times cheaper!


I used a simple icing sugar and water icing to decorate the cookie, coloured with gel colours.  Cost of icing was 60p for the icing sugar, I had the gel colours already but you can purchase them for around £1 and they last a very long time as you don't need to use much.  You could of course use 30g cocoa (30p) to make chocolate icing, and save on cost.


Giant Chocolate Chip  Birthday Cookie

175g softened butter (56p)
200g granulated sugar (11p)
1 large free range egg (16p)
2 tsp vanilla bean paste (30p)
250g self raising flour (8p)
2 tsp baking powder (6p)
100g dark chocolate chunks, I chopped up a chocolate block (30p)
100g milk chocolate chunks I chopped up a chocolate block (30p)

Preheat your oven to 200C/Fan 180C/400F/Gas Mark 6.  Grease and line a 23cm/9 inch non-stick, loose based flan tin or springform cake tin.

Cream the butter and the sugar in a large bowl until pale and fluffy.  Add the egg and vanilla then beat again until completely combined.  

Sift the flour and baking powder into the bowl, then gently but thoroughly mix it until a soft cookie dough forms.  Add the chocolate chips and stir to distribute them evenly through the cookie dough.

Spoon the mixture into the prepared flan tin then spread out evenly, ensuring the top is level.  

Bake in the preheated oven for bake for 20-25 minutes until golden and a skewer inserted into the centre comes out free of crumbs or dough.

Allow to cool in the tin and gently turn out the cookie before serving in slices.


Mini Lemon Meringue Pies - GBBO Botanicals Week

Sunday, 2 October 2016
It was Botanicals Week on The Great British Bake Off and for the signature challenge I decided to bake Mini Lemon Meringue Pies instead of a large one as they are much better for portion control purposes, and also more appropriate for afternoon tea which was when my family would get to devour them.  I cooked the meringue in the oven, no blow torches in my kitchen, so I think Mary Berry would approve. 


I used the Nutri Ninja Complete System that I had been sent to review to make the pastry.  It whipped up the pastry in a flash! So quick and easy to just bung all the ingredients for the pastry into the machine and whizz it for a few seconds.  

I also made my own lemon curd, and used the leftover egg whites for the meringue.  Such a delicious afternoon tea treat, and no waste as all of the eggs were used and I also used some lemons that were looking rather tired in our fridge.


Mini Lemon Meringue Pies - Makes 24

To make the pastry cases:

330g plain flour
3 Tblsp caster sugar
175g cold butter, cubed
Cold water

Put the flour, sugar and butter into the bowl of a processor, add 1 tablespoon full of ice cold water and mix until the dough comes together.  If you need to add more water do so one teaspoonful at a time until the dough comes together.  Divide the dough in half and wrap each half in clingfilm then chill in the fridge for at least half an hour.  

To make the dough by hand: Sift the flour and salt into a mixing bowl. Add the butter and rub into the flour until the mixture looks like fine breadcrumbs. Stir through the sugar before adding the a little water. 

I add a tablespoon of cold water then add more, if necessary, a teaspoonful at a time. Mix to a firm dough and press out to a disc shape. Wrap the dough in cling film and leave it to rest in the fridge for half an hour before you attempt to roll it out.  Whilst the pastry dough rests, make the lemon curd.


Lemon Curd

200g butter
225g caster sugar
Grated zest and juice from 3 lemons
4 free range eggs

Melt the butter in a saucepan over a medium heat. Whisk the sugar, lemon zest, lemon juice and eggs into the butter until well combined. Keep whisking continuously whilst the curd thickens and comes to the boil. Remove from the heat just as it is about to boil vigorously. Pour into a bowl to cool for a couple of minutes then put a piece of clingfilm over the curd, touching the surface so that a skin doesn’t form. When the curd has reached room temperature, transfer it to the fridge. You can store the lemon curd in a the fridge, just keep it covered. I put mine into sterilised jars topped with cellophane and a band. The curd will thicken considerably in the fridge and will keep for 2–3 weeks.


To make the meringue:

Make the meringue by whisking the egg whites with half the sugar until stiff peaks form. Gradually add the remaining sugar and the cream of tartar whilst whisking. You should end up with a very stiff meringue mixture. Carefully spread the meringue over the cake, make sure you cover the lemon curd completely and that the meringue forms a seal around the edge of the cake. Rough up the meringue with a spoon to make peaks on the top. Cook for about 8 minutes, until the meringue is golden. Keep an eye on it as it can go from golden to burnt very quickly. Cool for 10 minutes then chill in the fridge for half an hour to an hour before you serve it as this makes it much easier to cut neat slices.


Assembling and baking the mini pies:

Take one half of the pastry out of the fridge and unwrap it.  Roll out into an even shape, on a lightly floured surface, to about the thickness of a £1 coin. 

Grease two 12 hole muffin tins and cut large circles out of your dough before placing them into the prepared muffin tin holes. Prick the bottom of the pastry well with a fork and bake in a preheated oven set to 180C/160C Fan/350F/Gas Mark 4 for 10 minutes.  Repeat with the second batch of dough.

Once the cooked pastry cases have cooled, dollop some lemon curd into each one. I usually fill them about 3/4 full.  You can then pipe your meringue on top of each tart.  I make sure that I completely cover the lemon curd.

Bake the tarts in an oven preheated to 220C/200C Fan/425F/Gas Mark 7 and cook the tarts for approximately 10 - 15 minutes until the edges of the meringue start to turn golden.  Keep an eye on the tarts after 10 minutes as the meringue can brown very quickly.


Chocolate Hazelnut Swirl Bread

Thursday, 29 September 2016
I baked this delicious loaf for GBBO Bread Week, my family could barely wait until I had taken photos to devour some.  Our house smelled delicious, the scent of freshly baked bread combined with hazelnut and chocolate.  Oh my goodness, the loaf is SO good.  Great any time of day, from breakfast and brunch through to afternoon tea.  


Chocolate Hazelnut Swirl Bread

300g strong white bread flour
1/2 tsp salt
20g sugar
1 1/2 fast action yeast
185ml milk, I used whole milk (you could use oat/almond milk instead)
1 Tblsp oil
100g chocolate hazelnut spread (I made my own)

Combine all the ingredients in a bowl and mix until a rough dough forms.  Then either turn out the dough and knead until smooth and elastic (approximately 10 minutes), or knead in a stand mixer with a dough hook fitted for 5 - 7 minutes.

Once kneaded, put the dough into a lightly greased bowl, cover with cling film and leave in a warm place until doubled in size.  Once the dough has risen, knock it t ack and roll out to 40cm x 30cm (16in x 12in) rectangle with the longest side facing you. Spread the dough with a thin layer of chocolate hazelnut spread, leaving a 2cm (3/4 inch) border.  Roll up the dough tightly from the longest side and pinch the seam and ends to seal.  Turn the roll seam side down and fold the roll of dough in half then twist the halves around each other twice to make the swirl.  Tuck the ends of the roll in neatly then place the dough twist into a greased 2lb (900g) loaf tin.

Cover with greased cling film and leave in a warm place for the dough to rise once again.  My loaf took around 45 minutes in a warm kitchen.  Whilst the dough is rising, preheat your oven to 210C/190C Fan/425F/Gas Mark 7.

Take the clingfilm off the risen loaf then bake in the preheated oven for 30 minutes until golden and cooked through.  Leave to cool in the tin for 15 minutes before transerring to a wire rack to cool completely.


Yorkshire Puddings

Tuesday, 20 September 2016
It was Batter Week on The Great British Bake Off this week, and they were tasked with making 12 uniform and identical Yorkshire Puddings.  I have no idea if that is actually possible without making at least 3 or 4 batches as my Yorkshire Puddings tend to have a mind of their own and rise however they like.  


I was totally delighted that my Dampfnudeln earned me a Star Baker badge last week from Jenny who is hosting The Great Blogger Bake Off.  Hurrah! 


No pressure for this week then!  I baked my Yorkshier Puddings on a grey Monday afternoon before the school run and they all rapidly disappeared.  Toddler boy and 16yo had 4 each as soon as they were cool enough to devour.  I had a couple and there was one each left for my middle two daughters.  I had to bake another batch at their insistence.


I was intending to fill the Yorkshire Puddings with a creamy chicken and vegetable mixture to use up leftover roast chicken but they disappeared before I could even entertain making anything to fill them with.

Some of the school run Mums mentioned that their mothers used to give them Yorkshire Puddings with a dollop of jam as a snack after school, as did another lovely blogger on Instagram.  My daughters now want it to happen on a regular basis, I'm not sure about that but it will definitely become part of our after school snack repertoire.  Do you just save Yorkshire Puddings for roast dinners or do you eat them at other times?

Yorkshire Puddings

vegetable oil
2 large free range eggs
100g plain all purpose flour
100ml milk, I used full fat whole milk

Preheat your oven to 225C/425F/Gas Mark 9. 

Put a little oil into every hole of a 12 hole muffin tin and put into the oven for 10 - 15 minutes whilst you make the batter.  

Beat the eggs, flour and milk together in a jug until light and smooth.  Carefully remove the tray from the oven, then pour the batter evenly into each hole of the muffin tin.  Put the tray back into the very hot oven and bake for 12 to 15 minutes, or until risen and golden.


I am once again linking up with Mummy Mishaps and The Great Bloggers Bake Off.

Mummy Mishaps

Dampfnudeln

Saturday, 10 September 2016
I have been trying some of the technical challenges from The Great British Bake Off and made these delicious dumplings last weekend.  I had eaten Dampfnudeln before but not attempted to make them myself.


After having attempted making Dampfnudeln before the bread episode of Bake Off aired, I watched with great interest to see how they got on. The instructions the contestants were given were very scant indeed and it was no wonder that almost all of the struggled with the task.  I dare say that Paul Hollywood would not attempt Dampfnudeln often himself, and obviously had been scouring the globe for tricky recipes for the contestants to make.  With the right recipe and clear instructions the dumplings weren't difficult or faffy, and tasted very nice indeed with custard.


Dampfnudeln

500g bread flour
100g sugar
1 tsp ground cinnamon
7g sachet instant yeast
150ml whole milk
2 large free range eggs
70g unsalted butter, melted
1 tsp vanilla bean paste

Poaching liquid
25g unsalted butter
pinch of ground cinnamon
150g whole milk
25g sugar

Custard and plum sauce to serve, homemade or storebought.

Put all the Dampfnudeln ingredients into the bowl of a stand mixer with a dough hook fitted and mix until a soft dough forms.  Knead using the mixer for 7 - 10 minutes or until the dough is really smooth.  You can of course mix and knead the dough by hand but I was short on time and patience so on this occasion let my mixer do the work for me.  Transfer the dough to a lightly greased bowl, cover the bowl with greased clingfilm and leave in a warm place to rise until doubled in size, this took about an hour in a warm kitchen. 

Once the dough has risen, knock it back and then divide it into 12 equal portions and shape into balls.  I weighed mine to make sure they were all equal and each of the 12 balls weighed 75g.  

Put the poaching liquid ingredients into a wide heavy based saucepan and heat gently until the sugar has dissolved and the butter melted.  Take the pan off the heat and add the dough balls.  All the dough balls need to be touching the base of the saucepan in a single layer.  Put the lid on the saucepan and leave the dough balls to rise in the warm liquid for 15 minutes. 

After 15 minutes, put the saucepan back onto a low heat and cook the dumplings for 20 minutes before you are tempted to remove the lid.  A glass lidded saucepan would've been very handy but sadly mine was a cast iron saucepan and the lid was most definitely not see through.  After 20 - 25 minutes remove the lid and cook the dumplings uncovered for 5 - 10 minutes until all the liquid has been absorbed and the base of each dumpling is golden and caramelised.  

Serve the dumplings with warmed custard and plum sauce.  


Many thanks to Tesco who provided me with a Giftcard to purchase some items for this bake.  You can check out their baking recipes here.  


I am entering this bake into The Great Bloggers Bake Off hosted by Mummy Mishaps.

Mummy Mishaps


Versatile and Thrifty Flatbreads - Sweet or Savoury, for Credit Crunch Munch

Friday, 2 September 2016
I've taken over as co-host of Credit Crunch Munch from Fab Food 4 All so thought I would share a frugal and delicious recipe that I used often over the summer holidays.

Summer School holidays are always tricky, there's the endless requests for snacks and occasional moans of boredom.  Children seem to suddenly develop appetites akin to ravenous, roaming packs of grazing animals.  Fear not! These flatbreads kept my children busy whilst making them and also fill ed them up.


You could make mini flatbreads for lunchboxes and freeze them once baked for low fuss lunches, or after school snacks/dinners when a quick and filling meal is needed before/after after school clubs.


I used all purpose plain flour instead of bread flour as it is much cheaper and works perfectly fine in this recipe.  We made 5 large savoury flatbreads and 2 sweet ones, all of which freeze well and were almost the size of a large baking sheet.  The cost of the dough was roughly 46p made up of 30p flour, 10p yeast, 4p oil, 1p each salt and sugar.  Toppings of course would be an additional cost, as would the energy used be the oven to cook the flatbreads.


Versatile and Thrifty Flatbreads

900g/6 cups plain all purpose flour
1 tsp salt
2 tsp sugar
7g sachet instant dried yeast 
2 Tblsp oil
625ml/2 ½ cups lukewarm water

Combine all the ingredients in a large bowl.  Mix until a soft dough forms then knead for 10 minutes by hand, or 5 - 7 minutes in a stand mixer, until the dough is smooth and elastic.  Put the dough into a lightly greased bowl and cover with cling film.  Leave to rest prove until doubled in size, this took about an hour in a kitchen that was 25C.  

Once the dough has proved, tip it out onto a well floured surface and knock it back by kneading for a minute or two.

I divided the dough into 5 equal pieces, you can divide the into however many you like depending on the size you require your flatbreads to be.  I rolled each portion of dough out to about 1cm thick then transferred to lined baking sheets.  Preheat your oven to 210C/190C Fan/425F/Gas Mark 7.

Add whatever toppings you would like then let the dough rest for 10 minutes or so.  We made savoury flatbreads by spreading some diluted tomato paste (2 Tblsp tomato paste mixed with 2 Tblsp water), sprinkling over chopped pepper, spring onion and sweetcorn, then finely grating over some cheddar cheese.  I made sweet flatbreads out of two portions of the dough by kneading through a couple of handfuls of sultanas and topping the bread with a little melted butter and cinnamon sugar.    

Bake the flatbreads for 20 - 25 minutes until golden around the outside and cooked through, mini flatbreads will take less time to cook.  When cool enough to handle slice the flatbreads and serve.  You can freeze the flatbreads for another day if you cannot eat them all in one sitting.


Now it's your turn!  

Credit Crunch Munch
is a joint challenge run myself and Helen at Fuss Free Flavours.


To take part, blog about a food related money saving idea and add your post to the round up Linky.

Tweet using #CreditCrunchMunch and mention @utterlyscrummy and @fussfreeflavours

Please use the logo and also link to this post and Helen’s Credit Crunch Munch page.

Closing date of the challenge is 28th of the month.

By entering you are agreeing to let us use an image from your entry on this site, and to pin to Pinterest.

Please be respectful of other people’s copyright.

But feel free to send your recipe to as many other blog events as you like!

Here's a few ideas to ger you started:

Dishes using cheaper ingredients – cheap cuts of meat or vegetarian
Meals using leftovers
Meals using up the ends of packets
Substitutions of cheaper ingredients
Packed lunches
Meals that use less energy to cook
Pressure cooking
Slow cooking
Faster cooking – less oven time for example
Batch cooking for the freezer
Sustainable foods
Food you have grown yourself
Meals from reduced food in the supermarket


Chocolate Viennese Whirls

Thursday, 1 September 2016
When I discovered that they were baking Viennese Whirls on The Great British Bake Off this week I knew I had to give them a go. Of course I had to bake a chocolate version! Deliciously buttery and light biscuits sandwiched together with a rich dark chocolate ganache, how could I not bake them?!


I made sure my butter was very soft indeed so that the mixture was easy to pipe, and that I used a fairly big nozzle. I probably should have put the piped biscuits into the fridge for half an hour or so to ensure the piped biscuits looked more professional, but I'm not that bothered and they tasted totally scrumptious, so why faff if there's no need. I can just see the look of dismay on Paul and Mary's faces.

This batch of Chocolate Viennese Whirls cost £3.66 to make, or approximately 30p per Whirl.  Cost breakdown, exclusive of energy costs, is as follows: £1.02 butter, 25p icing sugar, 13p free range egg, 40p cocoa powder, 11p plain flour, 90p chocolate, 85p double cream.  You could serve the Whirls as plain biscuits and not sandwich them together with ganache, in which case the batch would cost £1.91 or 8p per biscuit for 24 biscuits.


Chocolate Viennese Whirls

300g very soft, but not melted, unsalted butter
1 cup icing sugar
1/2 cup cocoa powder
1 free range egg
2 1/2 cups plain flour

Chocolate Ganache
300ml double cream
400g dark chocolate, finely chopped

Beat the butter and icing sugar together until pale and flufffy, I used hand held electric beaters.  Carefully beat in the cocoa powder then the egg.  Mix in the flour by hand, using a wooden spoon, until completely combined  

Preheat your oven to 180C/160C Fan/Gas Mark 4/350F.  Line two baking trays with non-stick baking paper.  Put the biscuit mixture into a large piping bag fitted with a large star nozzle.  Pipe biscuits about 2 inches in diameter onto lined baking trays, allowing a little room for the biscuits to spread.

Bake in the preheated oven for 12 - 15 minutes.  Leave to cool on the trays for at least 5 minutes before transferring to a wire rack to cool completely.

To make the ganache
Heat the cream until almost boiling then add the chopped chocoalte.  Stir until completely combined.  Leave to cool until mixture reaches spreading consistency.  

Spread a the underside of a biscuit with a generous amount of chocolate ganache then place another biscuit on top. I managed to get 12 biscuit sandwiches from this recipe.  


I'm entering my Whirls into The Great Bloggers Bake Off, hosted by Jenny at Mummy Mishaps.

Mummy Mishaps


And also The Bake Off Bake Along co-hosted by Rhyme and Ribbons and This Particular.

Cheats Churros Boats with Mojito Soaked Fruit Salad

Wednesday, 31 August 2016
After making these delicious Beef Fajitas using mini Stand ’N’ Stuff tortillas from Old El Paso, I decided to try making a sweet recipe that would make a great party dessert.  The mini tortillas are available in packs of 12 from all major supermarkets with a RRP of £2.39. For more delicious recipe inspiration visit the Old El Paso website or find them on Facebook, Twitter and Instagram using @oldelpasouk and the hashtag #MiniMexican.


The little boat shaped soft tortillas, perfect for little hands to grab, and great for party food, were just begging to be brushed with melted butter and coated with cinnamon sugar.  I baked them until crisp and filled them with a delicious fruit salad that had been soaked in a mojito inspired syrup.  When topped with a scoop of creamy vanilla ice cream they were a very welcome tasty pudding treat on a very hot summer evening.  


You could of course make them more healthy by skipping the syrup and using natural yoghurt instead of ice cream on top of the fruit but I wanted decadent deliciousness not virtuous and low calorie. 


Cheats Churros Boats 
with Mojito Soaked Fruit Salad

12 Mini Stand and Stuff Tortillas
75g butter, melted
100g sugar
1 or 2 tsp ground cinnamon
3 or 4 cups of fresh fruit, peeled if necessary, cut into small chunks
100ml lime juice
100g sugar
50ml water
50ml white rum (optional)
small sprig of fresh mint.

Mix the cinnamon and sugar together in a bowl.  Melt the butter. Brush the mini tortillas with melted butter and then toss in cinnamon sugar to coat.  Place on a lined oven tray and bake at 200C/180C Fan/Gas Mark 6 for 7 - 10 minutes.  The mini tortillas will crisp up as they cool.

Mix together the lime juice, sugar and water.  Heat gently, stirring until sugar dissolves, add the mint, then leave to cool completely.  Mix in rum, only if serving to grown ups.  Pour the syrup over the prepared fruit, just enough to lightly coat the fruit, and leave to soak and chill in the fridge for around half an hour.  Any leftover syrup can be used to make mojito cocktails.  

Put the syrup soaked fruit into the crisp mini tortillas then top with a scoop of ice cream and freshly grated lime zest.  Serve immediately.


**Recipe commissioned by Old El Paso**

Beef Fajitas

Tuesday, 30 August 2016
I was asked to create a delicious filling for these cute mini Stand ’N’ Stuff tortillas from Old El Paso. They are little boat shaped soft tortillas, perfect for little hands to grab and great for party food as well as brilliant for lunch boxes now that school is back in session after the summer holidays.


I decided to make some super quick Beef Fajitas, you could use leftover cooked chicken too, or minced meat instead of stir fry thinly sliced meat. Packed with peppers and onions, and accompanied by a freshly made tomato salsa, these fajitas make a great dinner with a side salad - perfect for busy weeknights.


The mini tortillas are available in packs of 12 from all major supermarkets with a RRP of £2.39. For more delicious recipe inspiration visit the Old El Paso website or find them on Facebook, Twitter and Instagram using @oldelpasouk and the hashtag #MiniMexican.


You could use beef mince instead of stir fry beef, or even leftover cooked chicken.  This was a really tasty dinner that was whipped up in no time and liked by all of my family, definitely one we will be adding to our Meal Plan.

Beef Fajitas

Taco Seasoning
2 tsp mild chilli powder
2 tsp garlic granules
1 tsp paprika
1 tsp cumin

Mix together and use immediately or store in an airtight jar.

Salsa
4 tomatoes, finely diced
1 onion, finely dived
2 Tblsp fresh coriander, finely chopped
1 chilli, seeds removed and finely diced

Mix together, blend with a hand blender if you want a smoother salsa, then leave in the fridge until needed to give the flavours a chance to develop.

Herbed Soured Cream
150ml soured cread
fresh chives and coriander, finely chopped

Mix together the soured cream and herbs, then leave in the fridge until needed to give the flavours a chance to develop.

Beef Fajitas
400g stir fry beef
2 peppers, finely sliced
2 onions, finely sliced
2 Tblsp Taco Seasoning
150ml water
2 tsp cornflour
2 Tblsp water

Put a little oil into a large frying pan over a moderately high heat, add the peppers and onion.  Cook until the pepper and onions have softened then add the beef and cook, stirring all the time, until the beef has cooked through.  Add the taco seasoning and cook until fragrant, add the water and mix well.  Cook for a couple of minutes then mix the cornflour and water together and stir through to thicken the sauce.

Serve in tortillas with salad, salsa and herbed soured cream.  Squeeze a little lime juice over if you wish and sprinkle with fresh coriander to garnish.


**Recipe commissioned by Old El Paso**

Giant Jaffa Cake (Vegan)

Sunday, 28 August 2016
We enjoy watching The Great British Bake Off and trying out the bakes that the contestants have to make each week.  This week one of the tasks was to bake some Jaffa Cakes.  On the show they made standard small Jaffa Cakes but I thought that would be too much faff and decided to make a Giant Jaffa Cake instead.


I had to remake my jelly as the first batch didn't set firmly enough, but apart from that it was a fairly straight forward bake.  My family devoured some for pudding this evening, and there's still some leftover for a treat with a cuppa tomorrow.  


Giant Jaffa Cake (Vegan)

Sponge:
125g plain flour
125g caster sugar
1tsp bicarbonate of soda
1/2tsp tsp salt
125ml dairy free milk
30g oil (I used vegetable/rapeseed oil)
4tsp white wine vinegar
1 tsp vanilla bean paste

Jelly:
400ml orange juice
5g Agar Agar

Topping:
400g Dairy free Dark Chocolate, chopped/broken into small chunks

To make the sponge:
Preheat oven to 180C/160C Fan/Gas Mark 4  Grease and line a 20cm/8inch cake tin

Combine all the dry ingredients in a bowl.  Mix the wet ingredients together in a jug until completely combined.  Pour the wet ingredients into the dry ingredients and mix until just combined.  Pour the cake batter into your prepared tin and level the surface.

Bake for 25-30 minutes until the cake is golden and a skewer inserted into the middle of the cake comes out clean.  Allow to cool in the tin for 5 minutes before turning out onto a wire rack to cool completely.

To make the jelly:
Bring the fruit juice to the boil in a pan and sprinkle the agar agar powder on top. Stir in and boil for 2-3 minutes then remove from the heat, pour into a lined 20cm/8 inch cake tin, and leave to cool and set.
Carefully turn out the jelly onto the top of the sponge cake.  Put in the fridge to chill whilst you prepare the topping.

To make the topping:
Melt the chocolate in a bowl set over a saucepan of simmering water.  Once completely melted, leave to cool slightly then pour over the cake.  


I've added this post to the We Should Cocoa linky over at Tin and Thyme.


I'm entering this bake into the Great Bloggers Bake Off linky, hosted by Mummy Mishaps.

Mummy Mishaps

Brunch Bread Bake (Breakfast Strata)

Saturday, 27 August 2016
I am a big fan of volunteering, you learn new skills and meet new people whilst helping in the community.  I encourage my children to volunteer and help out where and when they can too.  My 16yo has been helping cook a Community Lunch each week during the school Summer Holidays and they gave her a delicious loaf of bread to bring home that was leftover from the lunch.


I decided to use the loaf of bread for our brunch this morning, and also use up some bacon that was heading towards the use by date, along with a pepper and some spring onions that were languishing in our vegetable draw in the fridge.

This bake would make a delicious lunch or dinner, you can vary the ingredients depending on what you have available.  Chorizo would be delicious instead of bacon, or chopped leftover ham could be used instead.  A vegetarian option would also be scrumptious with corn, pepper, spring onions, perhaps some grated carrot or courgette, or leftover roast vegetables.


Brunch Bread Bake

300g bacon, diced
6 free range eggs
375ml milk
1/2 tsp salt
black pepper, to taste
400g loaf stale bread, preferably slightly stale, roughly diced in 2cm chunks
1 pepper, finely diced
2 spring onions, green and white parts, finely sliced
2 large handfuls of grated cheddar cheese

Heat a large non stick pan over high heat and cook bacon until lightly browned.  Remove from pan and set aside to cool.  

Whisk the eggs, milk, salt and pepper together in a bowl or jug.

Put the prepared bread into a large resealable bag then pour in the egg mixture.  Seal the bag, massage slightly to mix the bread and egg mixture together.  Put in the fridge for at least half an hour to allow the bread to soak up the egg mixture.  Finely dice the pepper and thinly slice the spring onion, both green and white parts.   

Preheat oven to 180C/160C Fan350F/Gas Mark 4.

Line a 20cm cake tin with non-stick baking paper.  Add the almost all the cooked bacon and grated cheese, all of the pepper and spring onion to the bag of bread and mix through.  Pour the bread mixture into the prepared cake tin, squish down to level then scatter over a the leftover bacon and cheese. 

Bake for 30 - 35 minutes until cooked through and golden on top.  Allow to cool for at least 5 minutes before removing from the tin and cutting into slices to serve. 


Back to Top